1988 IMSA Jaguar XJR-9 by Andy Sapiro
Following is the story of this remarkable 1/24 replica of the Sebring 1988 version of the Jaguar XJR-9, told by its creator, Andy Sapiro. Enjoy! (KJS)
Kits Used
Hasegawa CC-7 Jaguar XJR-9 IMSA
Curbside kit. Body cut apart for front clip and rear engine cover. Doors cut from a second Hasegawa donor kit. Tires and wheels, with RB valve stems.
Tamiya Jaguar XJR-9 LeMans
Most engine and engine bay parts, most of the cockpit parts, including dash, most of the kit-based suspension pieces, and the front 1/3 of the chassis, and the radiator.
Additional Kit-based Parts
S&S photo-etch detail set for the Jag XJ-R
Designed for the Tamiya kit. Used about 1/4 of the set, including the engine bulkhead and valve cover scripts.
Hasegawa Jaguar XJS kit
Several engine bay parts. This kit has more accurate V12 block than the Tamiya.
Tamiya Toyota Group C kit
Used the transaxle skirts, which have the correct dimensions for an IMSA car. That's why you can't just turn the Tamiya kit into the IMSA spec race car. For instance, the halfshafts run under the skirts on the IMSA car. They run over the skirts of the LeMans car. The transmission tunnel on the Hasegawa kit is too narrow for the Tamiya transaxle, which is why I had to use a portion of the Tamiya Toyota chassis.
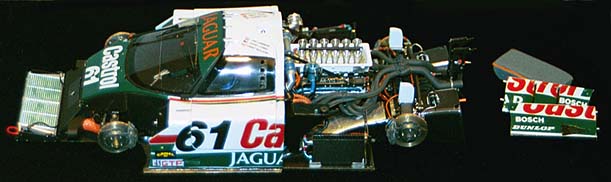
Construction
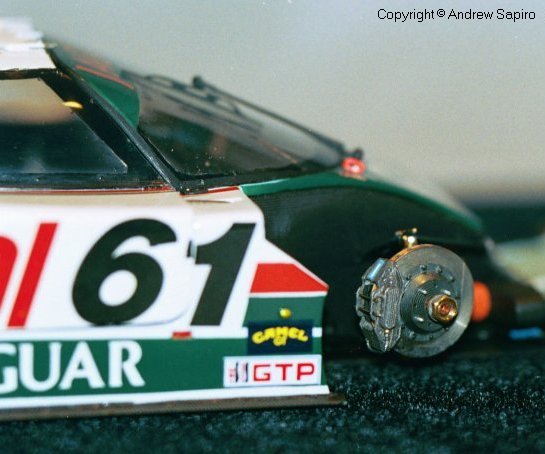
Hundreds of parts had to be made or modified to create an accurate replica of a car that I photographed at Sebring in 1988. Most of the front compartment and bulkhead is made of aluminum sheet and plastic. The suspension uprights are Tamiya kit based, with added detail. The brake calipers were modified from Replicas&Miniatures large sports car brakes, widened, finned and recast by Norm Veber. The hub carriers were turned from plastic rod, with bolts added. The brake rotors were turned and milled from brass, for each corner, and then plated with nickel.
This was one of the most time-consuming parts of the project, but it's the best way to duplicate the circular ventilation pattern on the discs. The photo-etched brakes on the aftermarket lack scale thickness. Brake ducts were made from wound wire and thinned Plastidip. Brake duct housings on the front clip were made of plastic. The front torsion bars are scratchbuilt. Most of the rear shock components were machined, as were the shock reservoirs. Springs were hand-formed from aluminum wire for the proper shape and diameter.
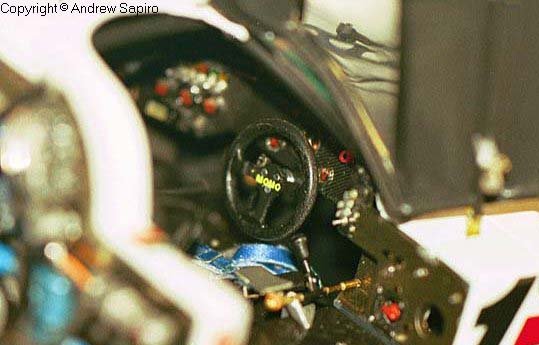
The cockpit has Tamiya based seats, which were covered in polishing cloth paper and painted to simulate the hard form covering on the seats. Belts were based on the Modelers photo-etched parts with some added detail. The gear shift, linkage, and supports are scratchbuilt. Roll cage tubing is added. The dash uses mostly hand-made switches and handles, because they look better - more dimensional - than the photo-etched switches in the S&S kit. If you can see the footwell, there are scratchbuilt pedals, and a foam cool box used at Sebring and other hot weather races. Inside door handles are made from aluminum and brass.
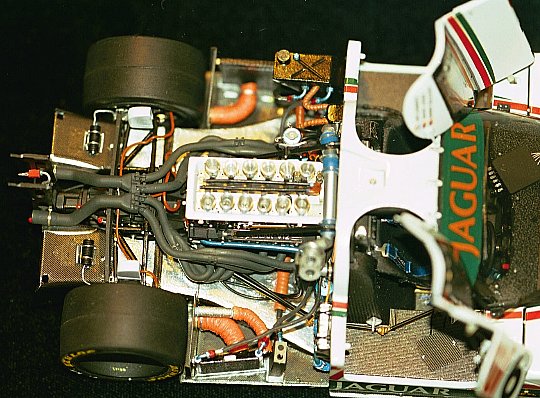
V12 Engine and Transaxle
Parts were used from Tamiya XJR-9 and Hasegawa XJS kits. From the Tamiya kit: Engine block halves and Part C1, Fuel injection housing - B7, and transaxle. From the Hasegawa kit: cylinder heads, distributor, timing chain cover, rear suspension support, wing supports.
Aftermarket parts include S&S XJR-9 photoetched valve cover script and fuel injection housing lining, Model Car Garage photoetched exhaust straps and injection linkage, Detail Master oil lines, insulated lines, plug wires, oil line fittings, RB Motion nuts and bolts, Model Doctor plastic hex nuts, and Replicas&Miniatures photoetched exhaust gaskets (1/12 dzus fasteners).
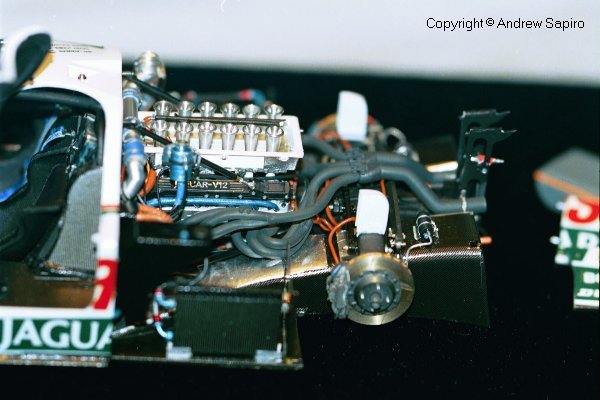
There are three main shortcomings in the Tamiya XJR V12. First, the exhaust pipes are awful. Second, the injection tubes should descend into the valve covers at a slight angle, rather than perpendicular. Third, Tamiya left out the cylinder head water pipes. These pipes are very prominent, and they should have been included.
I corrected these shortcomings, added detail, and replaced parts as needed. The engine block/transaxle halves from the Tamiya kit were cut apart, modified, and reassembled for greater accuracy and painting. Virtually every kit part used required correction or detailing. Most of the visible water, oil, and electrical lines were added, with fittings.
Exhausts are made from Contrail styrene tube with copper wire, bent to shape and glued into collector pipes cut from the Tamiya exhausts. The clips at the joints are made from soldered brass. Exhaust pipes are painted Floquil grimy black. Water pipes are Evergreen round stock, contoured and glued together, painted a mix of acrylic paints to simulate anodized blue.
Injection tubes are Evergreen round stock. Additional scratchbuilt pieces include the ribs over the transaxle, pump belts made of brass strip, and linkage for the fuel injection. Machined parts include aluminum injection trumpets, alternator, water pump, and fuel pump pulleys, airjack and air fitting on the wing support, fuel pump, brass half shaft cover, swirl pot, and overflow cylinder above the valve cover.

Engine compartment oil radiators were milled from aluminum bar stock, to duplicate the surface pattern and the cooling holes on the top and sides. Most oil and water line fasteners were machined, although a few are aftermarket parts. The fuel filler and crossover pipes were mostly scratchbuilt, with machined rings. The straps are from Model Car Garage.
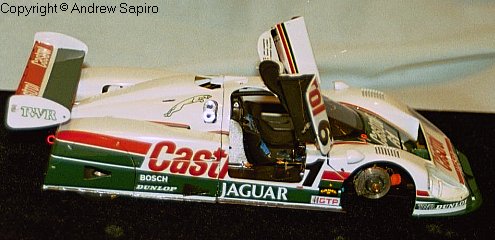
Body Construction
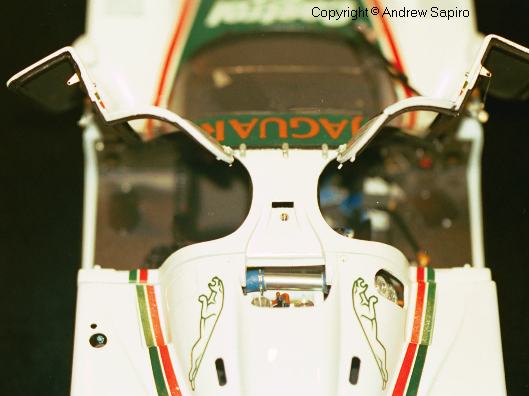
Numerous changes were made to the Hasegawa body, which is a one-piece curbside body, with the exception of the oil radiator covers. Using two kits, I separated the engine cover, front clip, and doors. The front splitter was modified to extend forward. All fender vents, along with engine compartment vents on the rear engine cover, had to be opened. The vents over the center of the rear engine cover were removed and replaced with a sandwich of plastic strips, to create the vents. NACA ducts were opened, deepened, and covered with brass screen. Bonnet clips were made from brass. The windshield wiper arm is a kit piece that was filed and scraped to scale dimensions. The wiper blade is scratchbuilt from bits of soldered brass strip.
The wing is basically the Hasegawa kit parts with added details. This is one of the other differences from the LeMans car - a one element wing, vs. a two element wing on the IMSA version. I thinned the side plates and added a Gurney flap and rivets.
Paint and Finish
The carbon fiber surfaces were created in several ways. The cockpit is covered in a pattern that I created and produced on my computer. The dash is covered with two different patterns from Scale Motorsports. SM's carbon fiber was used for the top and bottom of the chassis. The underside of the front clip and the engine cover is mostly SM's kevlar pattern.
I used MCW lacquer paints for the body, including their primer. The green and red was custom matched to the decals from the Hasegawa kit, which were not very good, so paint was used where possible. Two coats of MCW clear coat were used. Additional decals came from the Ricambi IMSA sheet. Some markings were done on decal paper with my computer and printer, for example the driver names. The print was too large for the Sebring car, but they appear to be correct for the Daytona winner.
Building Time
Don't ask. Too long.
Final Thoughts
Here's my advice to anyone who wants to do one of these. First, you definitely have too much spare time. For the IMSA version, there is a new decal sheet from I believe Studio 27. These should replace the Hasegawa decals. Use the S27 decals for the Tamiya LeMans version also, because Tamiya decals are not very opaque, and the white is not quite white, a common problem with old Tamiya decal sheets.
If you want to start opening doors and the front clip, I recommend that tyou do the Tamiya LeMans car instead of trying to deal with the combination of parts I struggled with. All of the fit problems that I encountered will be avoided. If you want to do a detailed IMSA car, you can make your life simpler by omitting the front end detail. I don't think that you could make an accurate IMSA car just from the Tamiya kit. There are too many differences in the two versions. Finally, the new Scale Motorsport photo-etch sheet has everything you will need for the Tamiya kit, except the engine bulkhead.
Andy Sapiro
Last Modified: April 22, 2001
|